dinsdag 30 maart 2010

Spring is here

Hallo allemaal,
Voor deze kaart heb ik een clearstamp van Penny Black gebruikt Garden Friends en ingekleurd met kleurpotloden. Dit had ik op een nestabilitie Dahlia gestempeld en de onderste een kwart slag gedraaid. Ik heb de kaart met papier van de serie Basic Grey `Origins` gemaakt. De randen heb ik geponst met een Martha Stewart pons Daisy Dot.
Verder heb ik de kaart afgewerkt met bloemen, strassteentjes en lint.
Lieve groetjes
Gretha

zaterdag 27 maart 2010

Tutorial zelf achtergrondpapier maken

Bij dit kaartje heb ik het achtergrond papier zelf gestempeld.

Hieronder zal ik beschrijven hoe je met een swirlstempel zelf leuke achtergrondpapier kunt maken.

Benodigheden voor het stempelen van het achtergrondpapier:

Plak de clearstempel op de acrylblok en snij een stuk ColorCore cardstock "Aruba" van 13,5cm x 13,5cm. Het is mooi om je swirls in een iets donkerdere kleur bijpassende inkt te stempelen dan je papier.


Stempel ongeveer in het midden de eerste swirl
Stempel daarna in een soort patroontje de rest van de swirls. Het hoeft allemaal niet zo precies, hoe speelser hoe mooier. Je achtergrondpapier is nu klaar.
Snij een stuk designpapier van My Mind's Eye "Dreamy" van 13,5 x 13,5cm. Scheur de binnenkant eruit en rul de randjes een beetje met je vingers om.

Plak deze daarna op je zelf gestempelde achtergrondpapier


Beinkt daarna de buitenste randjes van je kaart met Colorbox Cat's Eye Chalk in de kleur Chestnut Roan

Snij een strookje My Mind's Eye "Dreamy" van 13,5cm x 2.5cm, beinkt de randjes en plak deze strook onderaan je kaart. De girafjes zijn clearstamps Mindy's Zoo van Autumn Leaves. Stempel beide girafjes en kleur ze in en knipt ze uit. Ik heb ze ingekleurd met Prismacolor potloden in de kleuren "Chocolate"en "Goldenrod". Plak ze vast met dubbelzijdig foam, zodat je een beetje diepte krijgt. De tekst heb ik zelf uitgeprint in WORD met het font "Kid Print". Ik heb de tekst uitgestanst met de Nestabilities Classic Standard Circles en vastgezet met Scrapper's floss in de kleur Yellow Voor het tekstrondje heb ik ColorCore cardstock gebruikt in de kleuren "Tangarine"en "Poinsettia" De bloemetjes zijn van Prima marketing en die heb ik vastgezet met een splitpennetje. Het geheel heb ik geplakt op een stuk geel ColorCore cardstock van 14cm x 14cm in de kleur "Schotch" en daarna heb ik het geheel weer geplakt op een dubbel gevouwen strook ColorCore cardstock van 14,5cm x 14,5cm in de kleur "Mantis".
Je kunt natuurlijk de maten aanpassen.

Ik wens jullie veel plezier met het maken van deze kaart!

Groetjes, Jolanda


Easter Bunny

Hi everyone, I hope you are all enjoying your weekend so far, I have another Easter card to share with you today.

This cute image is called 'The Painter & the Bee' (PB2299L) and as always I have coloured the image with Copics...you must get bored of me repeating myself on every post...but one of these days I might surprise you and use a different colouring medium LOL. The gorgeous sunny papers are from the 'June Bug' pad by Basic Grey. I have punched a double border with the Martha Stewart 'Doily Lace' border punch...the Butterfly with the MS 'Monarch' punch and the flowers were created with the Large & Ex Large Retro Flower punches by EK Success.

Thanks for visiting...Enjoy your weekend!

Debbie x

woensdag 24 maart 2010

Get well

Hallo allemaal


Ik heb deze keer een stempel van House mouse chewable aspirin gebruikt en ingekleurd met de kleurpotloden. Het papier is van Kaisercraft. Aan de onderkant op het lint heb ik een malletje van Joy door de cuttlebug gehaald en erop gedaan.
Lieve groetjes

Gretha


dinsdag 23 maart 2010

Easter Card

Hi Everyone, I hope you are all enjoying the spring sunshine in you part of the world...the sunshine is streaming through my window at the moment...spring is definitely here at last! :)

I have an Easter card to share with you today.

The image has been coloured with Copic markers and I have used Spellbinders Nested Egg dies to cut the egg shapes. The pretty Lilac cardstock is by ColorCore. The punches I have used are the Eyelet Lace corner punch from the combo set, the 'Doily Lace' and 'Doily Lace Trim' border punches by Martha Stewart. The sentiment was computer generated and I have printed it on to Safmat paper and to finish the card off I have added some pretty paper flowers and pearls.

Thanks for visiting

Debbie x

zondag 21 maart 2010

A Stitch In Time!

Hi Everyone, I hope you all had an enjoyable weekend!
Today I have a card to share with you that I made for my friends birthday...I knew as soon as I saw this cute Penny Black image that she would love it...as she loves embroidery :)

The image is 'A Stitch in Time' and I have coloured the image with Copics. I have used my Spellbinders Nestabilities Circle and Scalloped Circle dies to mat & layer the image on Colocore cardstock. I have also stamped the little mouse at the top of the image twice and layered him up with dimensional foam pads. I have used the Martha Stewart 'Frond' punch to create the leaves in the floral arrangement....and to add to the sewing theme I have stitched around the borders with my sewing machine.

Thanks for looking
Debbie x

PB Karte von Domi


Hallo,

ich möchte Euch heute wieder mal eine Karte, mit einem süßen PB Motive zeigen:


Stempel: PENNY BLACK

Zubehör: SPELLBINDERS
MARTHA STEWART STANZER


Have a wonderful day

Hallo allemaal,

Mijn eerste kaart op deze blog.
Ik werk veel met Penny Black stempels, omdat ik ze zo grappig en leuk vind. Ik heb hier de stempel Tulip Jungle. Ik heb het ingekleurd met kleurpotloden.Het papier is van Making Memories.
Onder het afdrukje heb ik een randpons van Martha Stewart gebruikt `Daisy`, dat geldt ook waar ik het lintje doorheen geregen heb, dat heb ik eerst geponst met de `Threader`van Martha Stewart. De vlinders heten Monarch Butterfly en zijn 2 verschillende maten. Ik heb de kaart verder afgewerkt met een strik en strassteentjes op de vlinders.
Lieve groetjes

Gretha

vrijdag 19 maart 2010

Rising Flame!

Hi, there the weekend is nearly here and I hope you have lots of fun things planned to do :)
Something a bit different from me today...I have a fantasy art card to share with you.

This image is as always coloured with Copics. and I cut the large flames using the fireball from the 'Indie Art' Cricut Cartridge and the flame border at the base of the card is actually the Martha Stewart 'Grass' border punch.

Thanks for Visiting

Debbie x

Wedding Dance


Ik heb bij bovenstaand kaartje een digi stempel van Karen's Doodles gebruikt.
Papier SEI.
De stempel is uitgesneden met de cirkelsnijder C-1500 daaronder de Petite Circle Scallop Large gebruikt.
Bloemen uitgeponst met de papershapers large en medium van EK-Succes.
Swirls van Prima marketing
Stiksteek rondom is met de hand gedaan.
Op het jurkje heb ik nog kleine kraaltjes genaaid.
Het bovenstukje van de jurk met wat glitters versierd.
Voor het halssnoer heb ik kraaltjes geregen aan een nylon draadje.
Nog wat parels en kleine kraaltjes in het haar geplakt.

Groetjes van Bernadet

woensdag 17 maart 2010

Marianne Creatables flower dies tutorial

Hello, today I am going to share how I assemble the flower that I have made with the Marianne Creatables flower die that I have used on this card

You will need the dies of your choice, some card or designer paper, ribbon, tweezers, scissors and strong double sided tape.


With the front of the flower facing you, start by threading the ribbon through one of the slits on the petal and down through the centre hole, then back up through the next petal till you have threaded the ribbon through each petal.


Apply some strong double sided tape to the last petal and trim and stick down the ribbon.


Use a brad to join the top layer of the flower to the base then edge the petals with Stickles glitter glue


Tweet Talk

Ik heb een kaartje gemaakt met één van mijn nieuwste Penny Black stempels: Tweet Talk. Het is een slapstick stempel uit de New Release van Penny Black.
I made a card with one of my newest Penny Black stamps: Tweet Talk. It's a slapstick stamp from the New Release of Penny Black.

Om de kaart een liever effect te geven heb ik de hoeken van de kaart afgerond met de Crop-A-Dile Corner Chomper. De hoekjes van het afdrukje zijn ook afgerond met de Crop-A-Dile Corner Chomper, maar dan met de kleine hoek.
To give the card a more lovely effect I punched the corners with the Crop-A-Dile Corner Chomper. The corners of the image are also punched with the Crop-A-Dile Corner Chomper, but with the little corner.


-slapstick stempel Tweet Talk van Penny Black ingekleurd met Derwent Coloursoft potloden
-scrappapier van Doodlebug
-Cuttlebug embossing Perfectly Paisley
-2 gehaakte Grannies en 2 kleine bloemetjes
-Rick Rack Pink van The Paper Studio
-3 half parels
-randjes van het afdrukje en de gehele Cuttlebug embossing zijn bewerkt met roze Colorbox inkt
-hoekjes kaart en afdrukje afgerond met de Crop-A-Dile Corner Chomper

*****

Ik krijg vaak de vraag wat nu precies het verschil is tussen rubberstamps en clearstamps. Hier volgt een korte uitleg. Ik heb de Penny Black stempels als voorbeeld genomen.

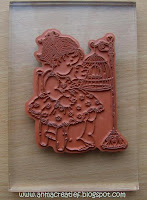
Er zijn 3 verschillende soorten stempels van Penny Black:


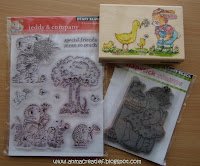
rubberstempels op houten blokken, clearstamps en slapstick stamps.


De rubberen stempels op een houten blok zien er natuurlijk leuk uit met een mooi gekleurd plaatje op het hout. Deze stempels zijn klaar voor gebruik.


De clearstamps moet je eerst op een acrylblok kleven, dan kun je er mee stempelen.


De slapstick stempels zijn rubberen stempels die al op foam zitten. Je moet ze eerst op een acrylblok kleven om te kunnen stempelen. Doordat de afbeelding ook op het foam staat kun je goed zien hoe je je afbeelding precies moet stempelen. Er komen nu steeds meer slapstick stamps uit. De nieuwste serie is nu verkrijgbaar bij Create4fun. Het handige van de slapstick stamps is dat ze niet zoveel ruimte in nemen en... ze hebben een leuk prijsje. :-) Ze zijn maar € 5,95 per stuk en daar heb je wel een heel mooi Penny Black stempel voor!


Zoals je aan de afdrukjes kunt zien maakt het geen verschil welk soort stempel je gebruikt. Het resultaat is hetzelfde. Ik heb voor deze 3 afdrukjes allemaal dezelfde inkt gebruikt: zwarte Archival inkt van het merk Ranger.

xxx Anne-Marije

dinsdag 16 maart 2010

Spring Joy!

Hi Everyone, spring is on the way! The waether here in the UK is really lovely and so I have a 'sunny' spring card to share with you.

The colours that I think of in spring has to be daffodil 'Yellow' & fresh spring 'Green'. The cute spring chic image is 'Spring Joy' by Penny Black available from PB Stamps. I have coloured the image with Copics. I have used 2 Martha Stewart border punches 'Lace Doily' and the 'Chick Family' and I also used the Martha Stewart 'Frond' punch for the flower arrangement.

Thanks for Visiting!

Debbie x

zondag 14 maart 2010


Bovenstaand kaartje is gemaakt met een digi stempel van Karen's Doodles en ze heetApple Girl.
Papier is van DCWV, Farmers Market.
De stempel is uitgestanst met de nestabilities classic oval large
De hoekjes onder het stempelafdrukje zijn afgerond met de hoekpons van EK -Succes.
De onderste bloem is uitgestanst met de shapeabilities Daisy Heads en de 2 bloemen erboven zijn van Marianne Design.
De vlinders zijn van Crealies.
Het takje is een stans van Bosskut.

Groetjes van Bernadet

zaterdag 13 maart 2010

Sweet mother


The gorgeous flower on the card I am sharing today was made with Marianne Designs Creatables die cut flowers.  I threaded narrow organza ribbon through the slits on each petal and popped a pearl brad in the centre.


hugs
Bev x


woensdag 10 maart 2010

lovely mice


De superschattige muisjes op deze kaart zijn van Penny Black. Het stempel heet: Till I Squeak.
These very cute mice on this card are from Penny Black. The stamp calls:
Till I Squeak.


Het roze papier is behang. Ik heb de cirkel geembost met Cuttlebug stencil D'ivine Swirl. De hoekjes van het afdrukje zijn afgerond met de Crop-A-Dile Corner Chomper.
The pink paper is wallpaper. I embossed the circle with Cuttlebug stencil D'ivine Swirl. The corners of the image are punched with the Crop-A-Dile Corner Chomper.


-stempel Penny Black Till I Squeak ingekleurd met Derwent Coloursoft potloden
-scrappapier van Basic Grey
-cardstock van DCWV
-Nestabilities Standard Circle Large en Scallop Circle Large
-Cuttlebug embossing D'ivine Swirl
-3 kleine bloemetjes en 3 half parels
-lint
-hoekjes afdrukje afgerond met de Crop-A-Dile Corner Chomper

Nog een fijne avond!
Have a nice evening!

xxx Anne-Marije